

Dear readers,
Long story short, doing bug bounties for mobile devices is hard. With this article I want to show you a rather simple way to be able to bypass certificate pinning for all some of your Android mobile targets. The method described here is based on research and an awesome blogpost+script written by Piergiovanni Cipolloni. Whenever there was a bypass for certificate pinning it was always involving manipulating the SSLContext of the application. The researcher showed a way to invoke Frida and manipulate the SSLContext to build a script that is able to universally bypass certificate pinning on Android.
How the bypass works#
In a nutshell the script works like this:
- It loads a rogue certificate from the file system (the CA Certificate of Burp Suite);
- It creates a very own KeyStore containing our trusted CA;
- In a final step it creates a TrustManager that trusts the CA in our KeyStore.
Whenever the application initializes its SSLContext, the Frida script hijacks the SSLContext.init() method and when it gets called, replaces the 2nd parameter, which is the application TrustManager, with our own TrustManager we previously prepared. On Android the SSLContext function is called as follows: *SSLContext.init(KeyManager, TrustManager, SecureRandom).*
From a beginner’s perspective it is hard to get to the same point as Piergiovanni Cipolloni, therefore this blogpost will include a bit of an introduction to get everything set up properly.
The following blogpost will include:
- How to install the Burp certificate to your device;
- How to configure Burp Suite for mobile devices;
- How to install Frida on your Android device;
- How to run a remote Frida Server;
- How to install Frida on your server;
- How to invoke the script with your application.
Why certificate pinning?#
With certificate pinning a developer ensures that their application does not accept fake certificates that are actually signed by an official certificate authority. The Android system itself only checks if the hierarchy of the certificate is correct and whether the CA (Certificate Authority) is listed in the so called “certificates of trust store”. But what happens if a malicious person installs a fake CA into the trust store? Well basically that person would be able to intercept the entire HTTPS traffic for the application. For this reason developers go a step further and compile the real certificate in the app and ensure that only this certificate can be used.
Pre-Conditions:
- You’d need an Android Virtual Machine (or real device);
- Some spare time;
- ADB / Android Tools installed + configured.
Installing the Burp certificate#
With Burp Suite running go to your browser (default: 127.0.0.1:8080) and click on CA Certificate.
This will download a file called cacert.der, take the file and rename it to cacert.cer. If you are wondering what the difference here is, please visit this link: http://www.gtopia.org/blog/2010/02/der-vs-crt-vs-cer-vs-pem-certificates/. The short story is it is just an alternate form.
If you are on a Mac and your default download directory is Downloads you may do the following:
1.) cd /Downloads – This changes your directory to Downloads;
2.) mv cacert.der cacert.cer – This renames the certificate;
3.) adb push cacert.cer /mnt/sdcard/DCIM/ – This copies the certificate to the SD card of your device.
Not too hard right?
On the device itself (whether virtual or real) we have to install the certificate in order to put it into the Android trusted cert store.
To do so:
Click on the Menu Button – Go to Settings – Scroll all the way down to Security – Choose Install from SD card
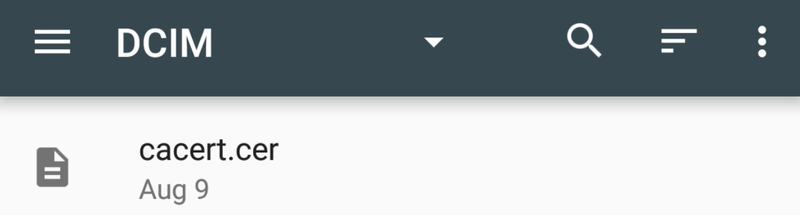
Tap on the cacert.cer and name the certificate for example Burp.
If everything worked you should see under -> Settings -> Security -> Trusted credentials -> Users, the following entry:
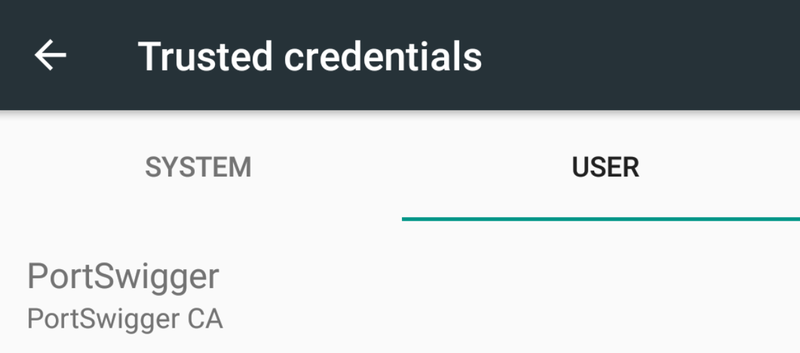
🎉Hurray! 🎉 – You have now installed your own Certificate Authority to your system!
Configuring Burp Suite#
Now that we have installed the PortSwigger (💗) CA on our system we need to set up the proxy in order to intercept the traffic from the application to the server.
Setting up your Android device#
Once again go to Settings -> Click on Wi-Fi -> Hold and Click WiredSSID -> Click on Modify Network -> Click on Proxy -> Choose Manual.
You will be presented the following form:
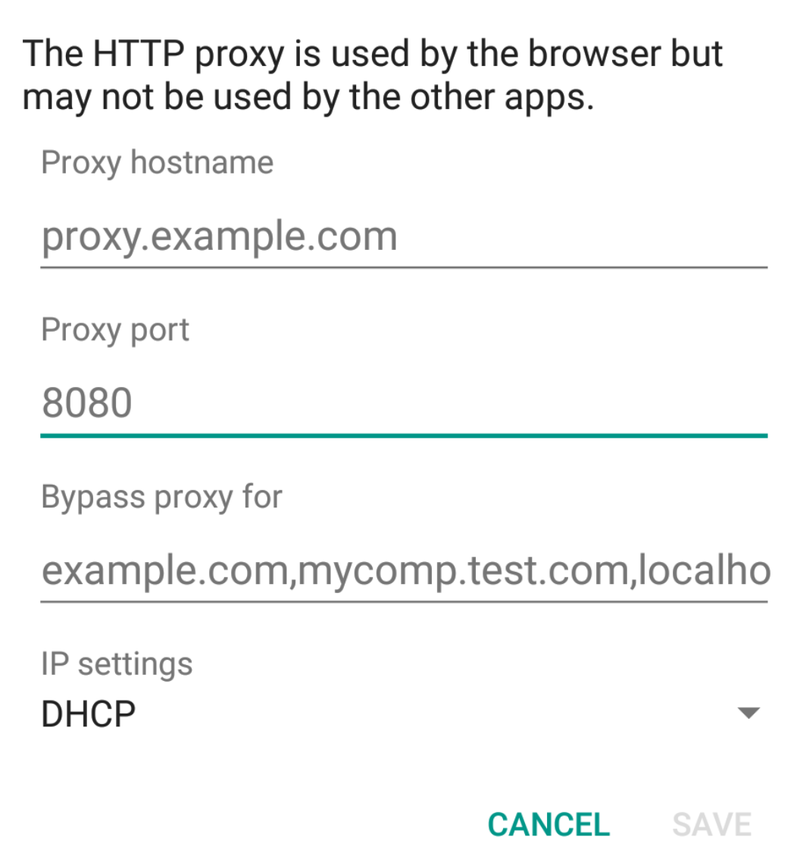
What you need to fill out here:
Proxy Hostname – Is the IP Address of your Burp Suite Application (of your PC, your local IP Address).
Port – Is the Port you have Burp Suite running on (default is 8080).
Setting up Burp#
Burp, by default opens a local Proxy running on localhost Port 8080, in order to intercept our mobile traffic we have to set up Burp to listen on the external IP address. Start Burp Suite and go to Proxy -> Options select the current configuration (as shown in the picture below) and click on Edit.
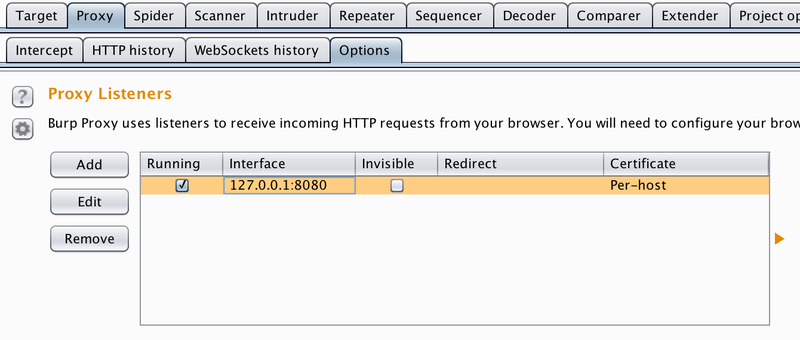
Now select the option Specific Address and choose your local IP address (in my case it is 192.168.0.193). For you it can vary depending on how your DHCP server is assigning addresses.
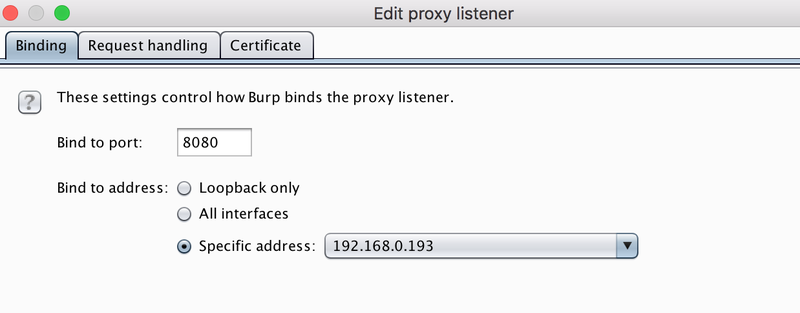
If you are unsure which is your IP address, open up a terminal and type (on OSX) ifconfig en0 | grep inet.
If you’ve followed this tutorial to this point – 💪 You are now able to intercept traffic through the application without Certificate Pinning 💪! The next chapter will be about bypassing certificate pinning.
Installing Frida on the device#
In order to bypass certificate pinning using this method we need to have a copy of Frida-Server installed on our Android device. To do so, we need the latest version of Frida-Server which can be downloaded from the Frida releases page on GitHub: releases, you now will wonder which version you need here…🤔 x86? x86_64? arm? – Thank god there is a command for everything! Just do adb shell getprop ro.product.cpu.abi to find out the right version for you, in my case it was x86. So for me the right version to choose was frida-server-10.6.15-android-x86.xz. The experienced reader will notice that the .xz extension is an archive, before we can use the binary we have to extract it first. For the terminal geeks among you just use tar -xJf frida-server-10.6.15-android-x86 for everyone else, the Unarchiver is your best friend. After extracting the binary we once again need to use the terminal.
- ) mv frida-server-10.6.15-android-x86 frida-server – To rename it to
frida-server;
2.)adb root – To ensure your environment is capable of running commands as root;
3.) adb push frida-server /data/local/tmp/ – To copy the frida-server binary to the device;
4.) adb shell "chmod 755 /data/local/tmp/frida-server" – To give the binary the correct permission on the file system;
5.) adb shell "/data/local/tmp/frida-server &" – To run the frida-server as a service in the background;
5.1) adb shell "/data/local/tmp/frida-server --listen 0.0.0.0 &" if you want to have frida-server running on an external IP.
Installing Frida locally#
🎉🎉Across all platforms, all you need is sudo pip install frida 🎉🎉
To verify your Frida installation (both remote and local) you need to do a frida-ps. This displays a ps command that produces a list of the currently running processes on your device.
If connected via USB: frida-ps -U.
If you are using Frida on an external address frida-ps -H 192.*.*.* whatever the address of your phone is.
If you are seeing a similar output:
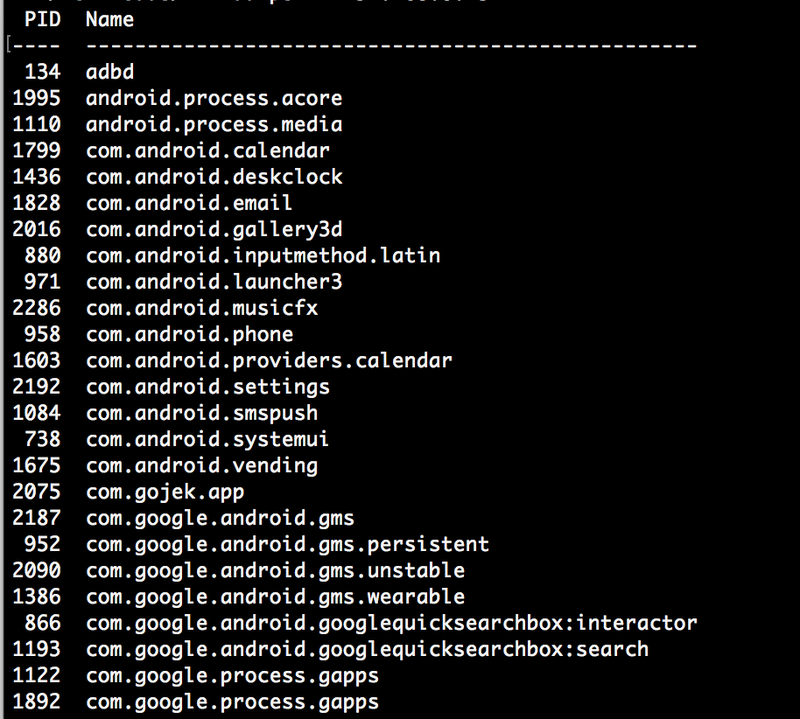
You are the chosen one, and ready for bypassing certificate pinning.
For the proof of concept I am going to use a random application here, if you want a real-world scenario have a look at the many mobile bug bounties which can be found on HackerOne, Bugcrowd, Synack or Zerocopter.
To start bypassing certificate pinning, we need the Android SSL Re-pinning Frida script by Piergiovanni Cipolloni, which can be found here, here or at the bottom of this blogpost.
Bypassing certificate pinning using Frida#
First of all, we need to install our target on the device, this can be done in multiple ways:
1.) Install the application from the Google Store.
2.) Download the application using Apkpure or apk-dl.
After doing so, open your terminal and install the application using adb install com.company.whatever.apk. Done 🐶.
The next step is to choose your target from the applications, as we did before this can be done using: frida-ps -H 192.*.*.* for a remote Frida server, or frida-ps -U if you have your device connected via USB. What you need to do next is create a copy of your previously generated cacert.cer (if you have followed the tutorial until this point it should still be in your Downloads folder).
For the very last time (I promise!) open up your terminal:
1.) cd Downloads – Move to the Downloads folder where your “cacert.cer” is;
2.) mv cacert.cer burpca-cert-der.crt – Rename it to match the file in the Frida Script;
3.) wget https://techblog.mediaservice.net/wp-content/uploads/2017/07/frida-android-repinning_sa-1.js – Download the Frida script;
4.) adb push burpca-cert-der.crt /data/local/tmp/cert-der.crt – Push the rogue certificate to the device;
5.) frida -U -f it.app.mobile -l frida-android-repinning_sa-1.js --no-pause 🎉 NOW FINALLY 🎉 – WE DID IT!
If you see the following output:
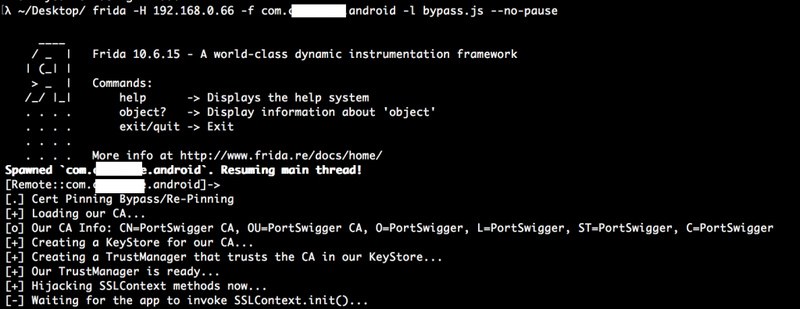
It means you did everything right and you can now finally intercept all the traffic from those juicy bug bounty programs out there.

Thank you very much!
Patrik Grobshäuser
PS: A big shoutout to
EdOverflow for 📚 proofreading 📚
/*
   Android SSL Re-pinning frida script v0.2 030417-pier

   $ adb push burpca-cert-der.crt /data/local/tmp/cert-der.crt
   $ frida -U -f it.app.mobile -l frida-android-repinning.js --no-pause

   Universal Android SSL Pinning bypass with Frida
*/

setTimeout(function(){
    Java.perform(function (){
    	console.log("");
	    console.log("[.] Cert Pinning Bypass/Re-Pinning");

	    var CertificateFactory = Java.use("java.security.cert.CertificateFactory");
	    var FileInputStream = Java.use("java.io.FileInputStream");
	    var BufferedInputStream = Java.use("java.io.BufferedInputStream");
	    var X509Certificate = Java.use("java.security.cert.X509Certificate");
	    var KeyStore = Java.use("java.security.KeyStore");
	    var TrustManagerFactory = Java.use("javax.net.ssl.TrustManagerFactory");
	    var SSLContext = Java.use("javax.net.ssl.SSLContext");

	    // Load CAs from an InputStream
	    console.log("[+] Loading our CA...")
	    cf = CertificateFactory.getInstance("X.509");

	    try {
	    	var fileInputStream = FileInputStream.$new("/data/local/tmp/cert-der.crt");
	    }
	    catch(err) {
	    	console.log("[o] " + err);
	    }

	    var bufferedInputStream = BufferedInputStream.$new(fileInputStream);
	  	var ca = cf.generateCertificate(bufferedInputStream);
	    bufferedInputStream.close();

		var certInfo = Java.cast(ca, X509Certificate);
	    console.log("[o] Our CA Info: " + certInfo.getSubjectDN());

	    // Create a KeyStore containing our trusted CAs
	    console.log("[+] Creating a KeyStore for our CA...");
	    var keyStoreType = KeyStore.getDefaultType();
	    var keyStore = KeyStore.getInstance(keyStoreType);
	    keyStore.load(null, null);
	    keyStore.setCertificateEntry("ca", ca);

	    // Create a TrustManager that trusts the CAs in our KeyStore
	    console.log("[+] Creating a TrustManager that trusts the CA in our KeyStore...");
	    var tmfAlgorithm = TrustManagerFactory.getDefaultAlgorithm();
	    var tmf = TrustManagerFactory.getInstance(tmfAlgorithm);
	    tmf.init(keyStore);
	    console.log("[+] Our TrustManager is ready...");

	    console.log("[+] Hijacking SSLContext methods now...")
	    console.log("[-] Waiting for the app to invoke SSLContext.init()...")

	   	SSLContext.init.overload("[Ljavax.net.ssl.KeyManager;", "[Ljavax.net.ssl.TrustManager;", "java.security.SecureRandom").implementation = function(a,b,c) {
	   		console.log("[o] App invoked javax.net.ssl.SSLContext.init...");
	   		SSLContext.init.overload("[Ljavax.net.ssl.KeyManager;", "[Ljavax.net.ssl.TrustManager;", "java.security.SecureRandom").call(this, a, tmf.getTrustManagers(), c);
	   		console.log("[+] SSLContext initialized with our custom TrustManager!");
	   	}
    });
},0);